

How to install AUTOCOM 2020.23 diagnostic software for DS150E
Version 2020.23 R3
Discover this AUTOCOM multi-brand diagnostic software, pre-installed on a virtual machine for easy and quick use.
This solution combines the power of multi-brand automotive diagnostics with the convenience of a pre-configured virtual machine. No more worrying about complex installations or hardware compatibility. This software is ready to use as soon as you download it.
With this pre-loaded virtual machine, you can instantly access a complete suite of diagnostic tools for a wide range of vehicles, all within a secure and isolated virtual environment. No more configuration hassles or software conflicts. Simply launch the virtual machine and start diagnosing your vehicle's problems.
Download and installation tutorial.
- Download the CDP 2020.23.rar archive, containing the partition with the MULTIDIAG PRO 2020.23 software.
- If you haven't already, download and install WinRAR for free to extract the archive.
- Download and install the VM Ware software, which is required to run the previously downloaded AUTOCOM partition.
- Unzip the CDP 2020.23.rar archive into your documents using WinRAR.

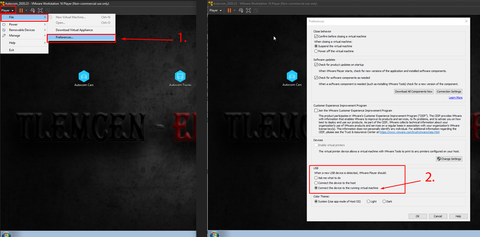
- Open the VM Ware 17 software, click on "Open a Virtual Machine", then search for the CDP 2020.23 or AUTOCOM 2020.23 folder.

- Inside, you will find a single file named "2020.23.vmx". Click on it once to open it. You will then see the partition added to the VMware software .
- Launch the virtual machine by pressing "Play virtual machine".

- When prompted, select " I Moved it " to avoid any subsequent activation issues.

- Welcome to the virtual desktop, where you will find the AUTOCOM Car and Truck software .

- Configure the software to connect the USB ports to the virtual machine rather than the main computer .
- You can now update your probe to ensure its compatibility with the new software .


- Enjoy!
Requirement:
Enable virtualization on your PC if this message appears:

--> How do I enable virtualization?
Enable virtualization in the BIOS:
Regarding the error message indicating that your computer's virtualization function is disabled to launch VMware software.
To remedy this, please follow these steps:
1. Access the BIOS:
- Restart your computer.
- During the restart, press the appropriate key to access the BIOS. This key may vary depending on your computer manufacturer (usually it is F2, F10, F12, or Delete).
- If you don't know the key, you can search the internet using your computer model.
2. Locate the virtualization function:
Once in the BIOS, look for an option related to virtualization. This option may be called "Intel Virtualization Technology (VT)" for Intel processors, or "AMD-V" for AMD processors.
3. Enable the virtualization function:
If the virtualization function is disabled, change the option to enable it.
Save the changes and exit the BIOS. This step may vary depending on your computer's BIOS, but usually, you can do this by selecting "Save & Exit" or a similar option.
4. Restart your computer:
Restart your computer for the changes to take effect.
After following these steps, please restart the software and check if the problem persists.
Download New Vmware Autocom 2020.23 , autocom vmware 2020.23 activated, autocom vmware 2020.23 activated


